
Ask an AI about this page
 ChatGPT
 Claude
 Perplexity
 Google AI Mode
 Microsoft Copilot
 Grok
Grok Mistral Le Chat
The HTTP Request step
Updated

The HTTP Request step sends the automation’s data to a URL of your choice: a CRM, a mailing tool, a WhatsApp provider BCL does not support, or your own system. BCL sends it from its server when the automation runs, so it works even when nobody has BCL open.
For a worked example, see Send orders to your CRM.
Set up the request
Section titled “Set up the request”Add the step with Add Node → HTTP Request, then double-click it to open HTTP Request Action Settings.
-
Under Basic Configuration, enter an Action Name, such as “Send to CRM”.
-
Choose the Method: GET, POST, PUT, PATCH or DELETE. Most systems that receive new records want POST.
-
Enter the Request URL, up to 500 characters. It can contain variables, for example
https://api.example.com/orders/{order_number}. -
Fill in the three tabs below it as your system’s documentation asks: Query Parameters, Headers and Body.
-
Click Send Test Request to try it with sample data.
-
Click Save HTTP Request.
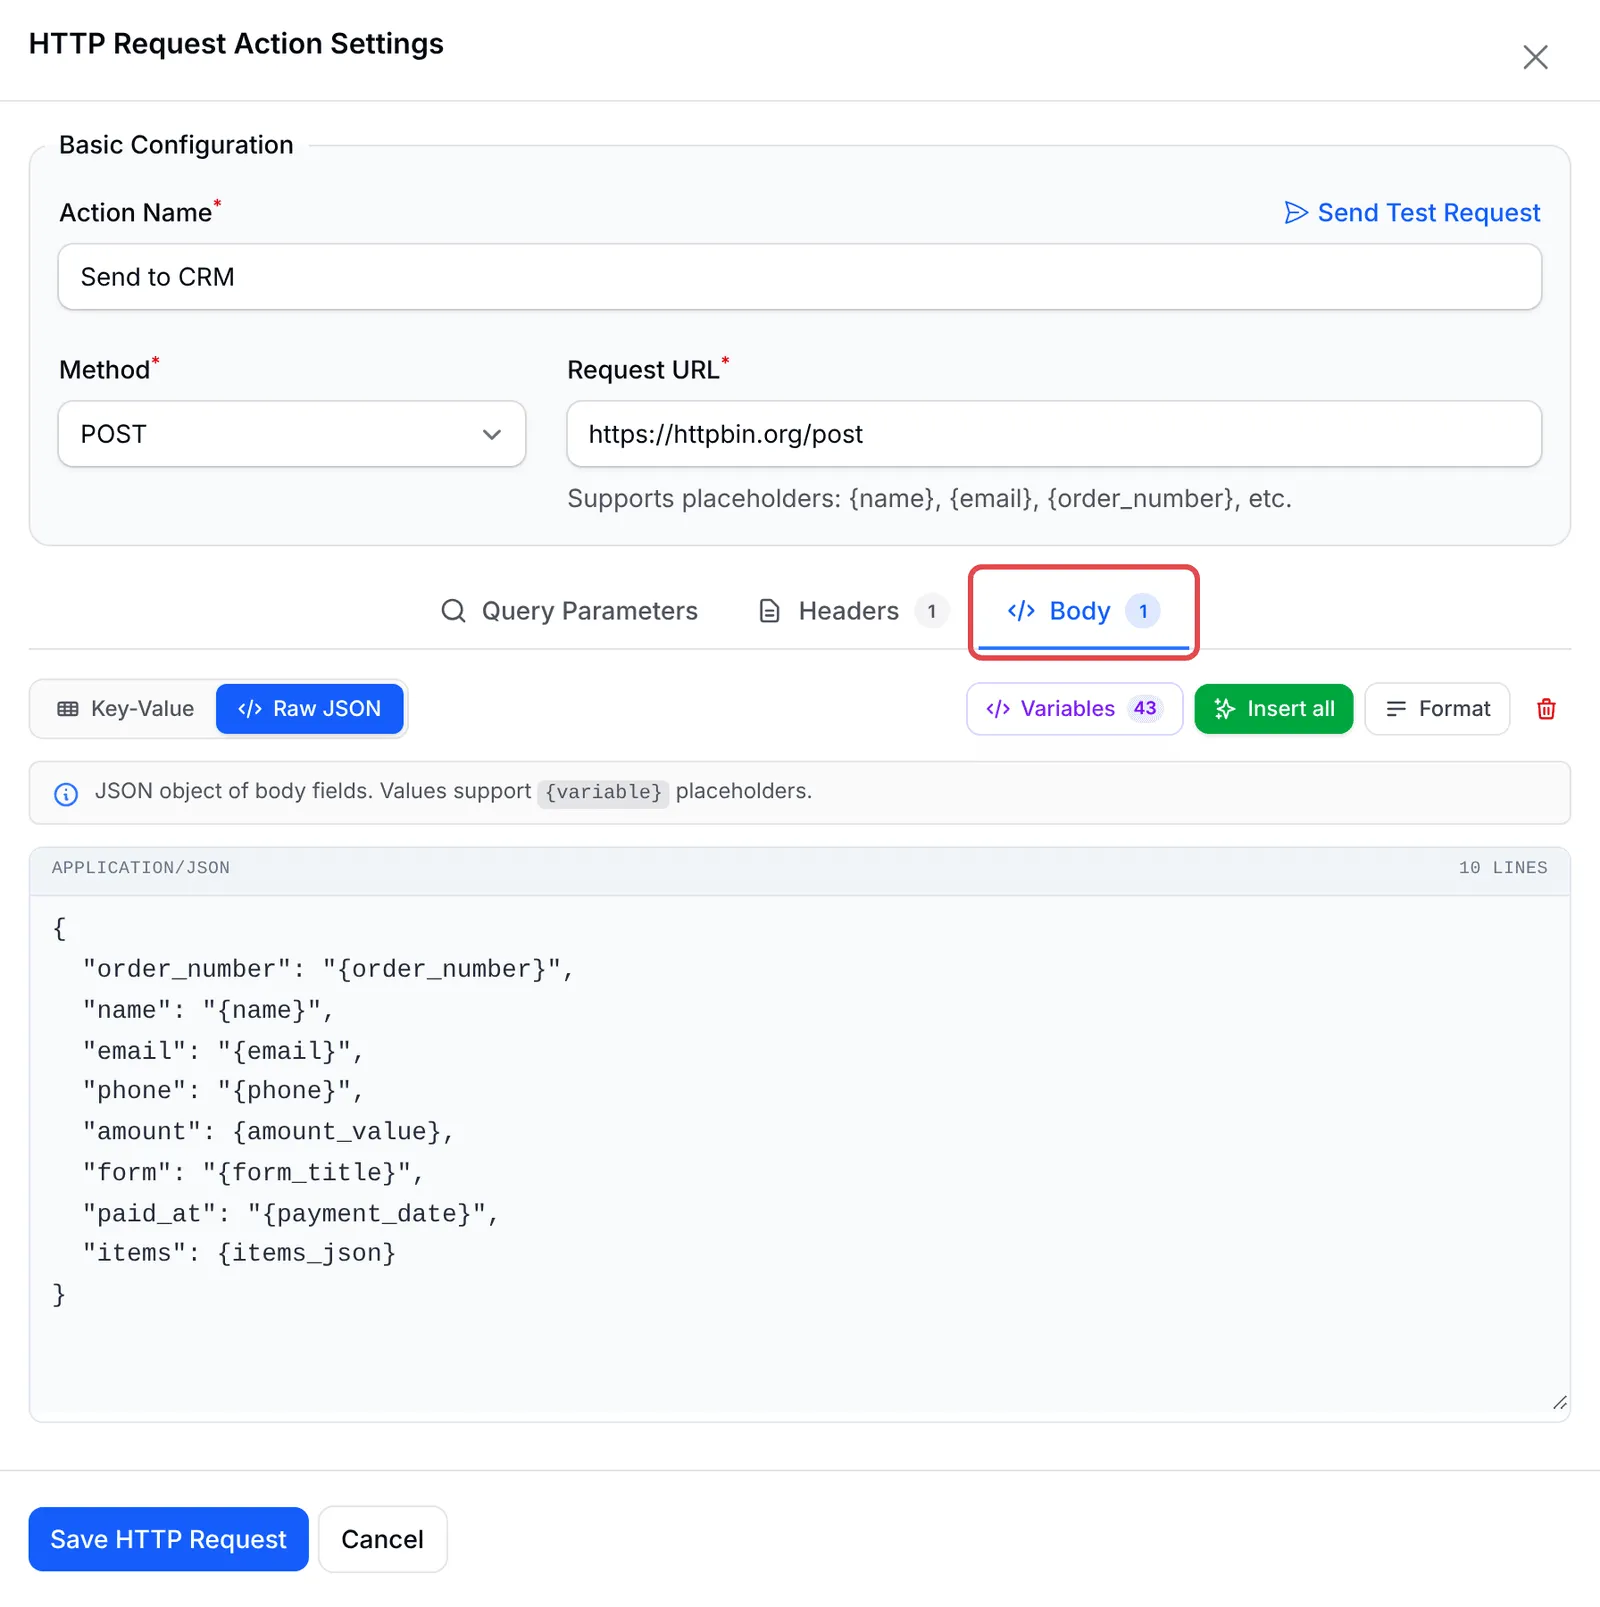
The three tabs
Section titled “The three tabs”Each tab can be filled in two ways. Key-Value gives you rows of name and value. Raw JSON (on Query Parameters: Raw Query) lets you type the whole thing yourself.
| Tab | Key-Value rows become | Raw format | Example |
|---|---|---|---|
| Query Parameters | ?name=value pairs added to the URL |
A query string without the leading ? |
source=bcl&order={order_number} |
| Headers | One HTTP header per row | A JSON object | {"X-Api-Key": "your-api-key"} |
| Body | One field per row, sent as JSON | A JSON object | {"email": "{email}", "amount": {amount_value}} |
The Body tab is not sent for GET requests. Values in every tab can use variables.
The buttons above each tab help you fill it:
| Button | What it does |
|---|---|
| Variables | Lists the variables of your trigger. Click one to copy it. |
| Insert all | Adds every variable of the trigger, named after itself, for example "order_number": "{order_number}". A quick start that you then trim. |
| Format | Tidies the JSON in Raw JSON mode and tells you if it is not valid JSON. |
| Bin icon | Clears the tab after you confirm. |
In Key-Value mode, the code icon on each row inserts a variable into that value, and each row can be copied or removed.
Variables in a JSON body
Section titled “Variables in a JSON body”BCL swaps the variables first and then reads the body as JSON. Two things follow from that:
- Put text variables in quotes:
"name": "{name}". - Leave number and list variables without quotes so they arrive as numbers and lists:
"amount": {amount_value}and"items": {items_json}. The editor’s Format button calls this invalid JSON because of the bare{...}, but after the swap it is valid.
If the body is still not valid JSON after the swap, BCL sends an empty body. This can happen when a customer’s answer contains a double quote. Test with real-looking data before you rely on it.
Test the request
Section titled “Test the request”Send Test Request (next to Action Name) sends the request right away with sample values, such as “Ahmad Ali” and “LINK-12345”. A green Test Request Successful notice shows the status code and the start of the reply; a red Test Request Failed notice shows what went wrong. The test waits up to 30 seconds.
The test sends real data to the URL, so point it at a test endpoint of your system if it would otherwise create a real record.
What happens when it runs
Section titled “What happens when it runs”When the automation runs, BCL waits up to 10 seconds for a reply and retries twice on a connection problem. A reply with a 2xx status code counts as success.
In the history, open the run with View. The step shows Completed or Failed, and View Response shows the URL, method, status code and the reply. A failed request shows the status code, such as HTTP 401, followed by the other system’s error message if it sent one. Replies larger than 50,000 characters are cut short.
A few habits keep requests safe and reliable:
- Keep API keys in Headers, not in the URL. Many systems accept an
AuthorizationorX-Api-Keyheader; the URL is shown in the history. - Use
{amount_value}rather than{amount}for numbers.{amount}includes “RM”, which the other system may reject. - One request per destination. To send to two systems, add two HTTP Request steps.
- Use Payment Successful, not Payment Initiated, for orders. Initiated fires before the customer pays, so unpaid orders would reach your CRM too.
Common issues
Can I send new leads straight to my CRM or mailing tool?
Yes. Build an automation on New Lead Received with an HTTP Request step. Put the tool's API address in Request URL, its API key in Headers, and map your lead fields in Body, for example "email": "{email_address:2}".
The request arrives but the name and email are empty. Why?
The variables do not match your fields. Lead form fields need the name and id, such as {email_address:2}. A variable that does not exist is sent empty without an error. Copy the keys from the Variables list.
How do I know whether the other system accepted the data?
Open the automation's Overview and click View on a run. The HTTP Request step shows the status code and, under View Response, what the other system replied.
Was this article helpful?
Thanks for your feedback.
Sorry this didn't help. WhatsApp us and we'll sort it out with you.