
Ask an AI about this page
 ChatGPT
 Claude
 Perplexity
 Google AI Mode
 Microsoft Copilot
 Grok
Grok Mistral Le Chat
Automation actions
Updated

After the trigger, an automation runs its steps from left to right. You add a step with Add Node at the top right of the canvas, and BCL connects it to the last step. Double-click any step to open its settings.
Steps you can add
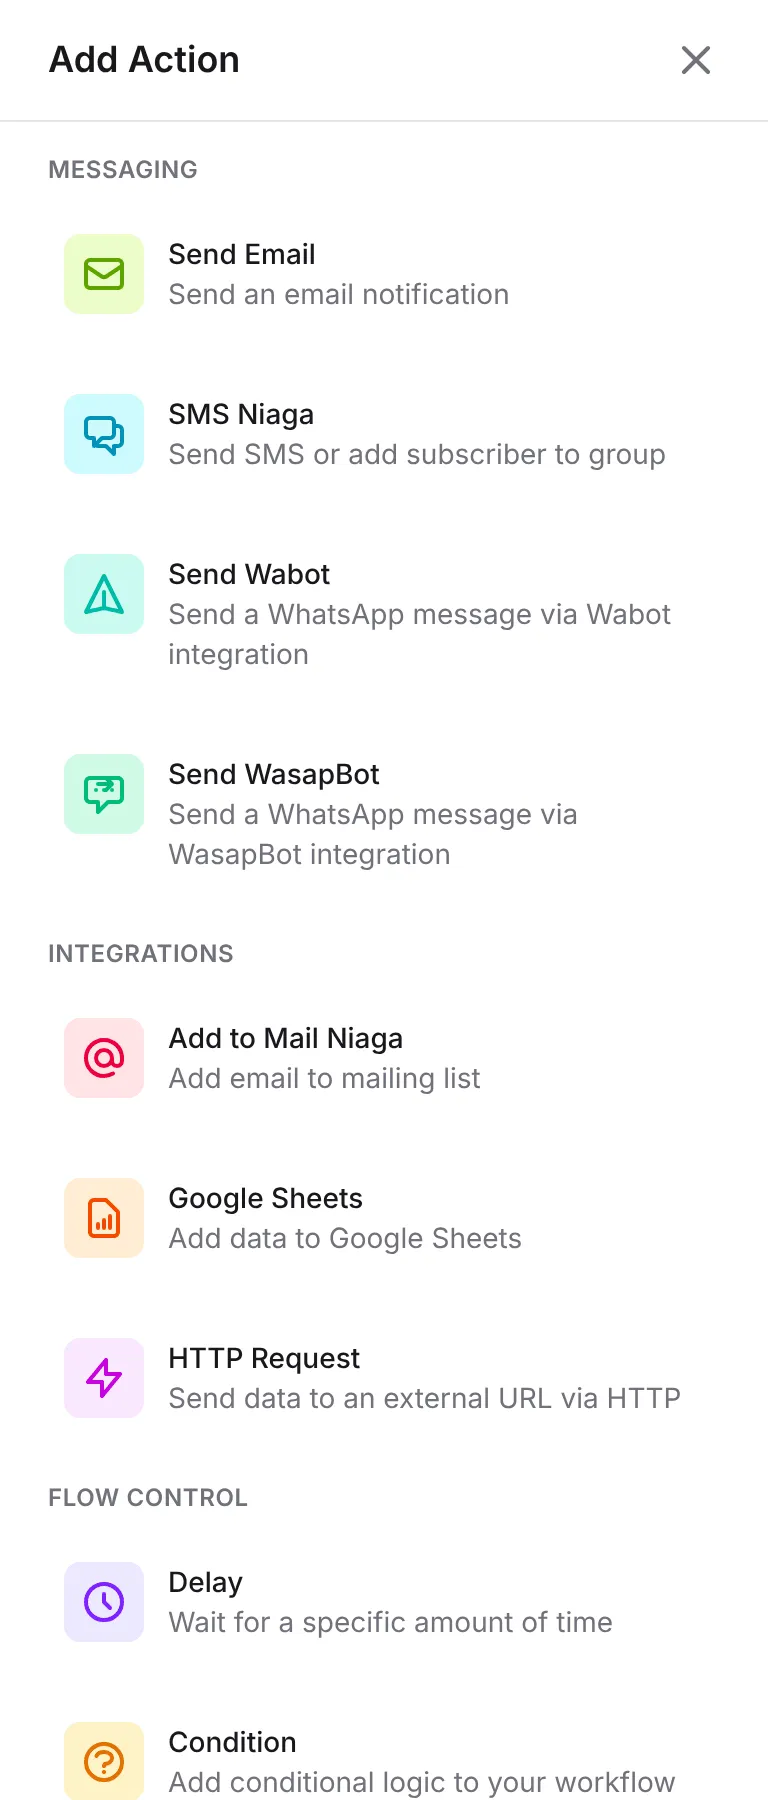
Section titled “Steps you can add”The Add Action panel groups the steps like this:
| Group | Step | What it does | Needs |
|---|---|---|---|
| Messaging | Send Email | Sends an email. | Nothing |
| Messaging | SMS Niaga | Sends an SMS or adds the person to an SMS Niaga group. | SMS Niaga connected |
| Messaging | Send Wabot | Sends a WhatsApp message through Wabot. | Wabot connected |
| Messaging | Send WasapBot | Sends a WhatsApp message through WasapBot. | WasapBot connected |
| Integrations | Add to Mail Niaga | Adds the email address to a Mail Niaga mailing list. | Mail Niaga v1 or v2 connected |
| Integrations | Google Sheets | Adds a row to a sheet, or updates a row. | Google connected |
| Integrations | HTTP Request | Sends the data to another system’s URL. | Nothing |
| Flow Control | Delay | Waits for a time, or until a date and time. | Nothing |
| Flow Control | Condition | Continues only when rules match. | Nothing |
Connections live under Platform Setup → Integrations, on the tabs SMS (SMSNiaga), Mail Niaga (Automation), WhatsApp (Automation) and Google. Until a provider is connected, its step shows a warning with a link there and its fields are locked.
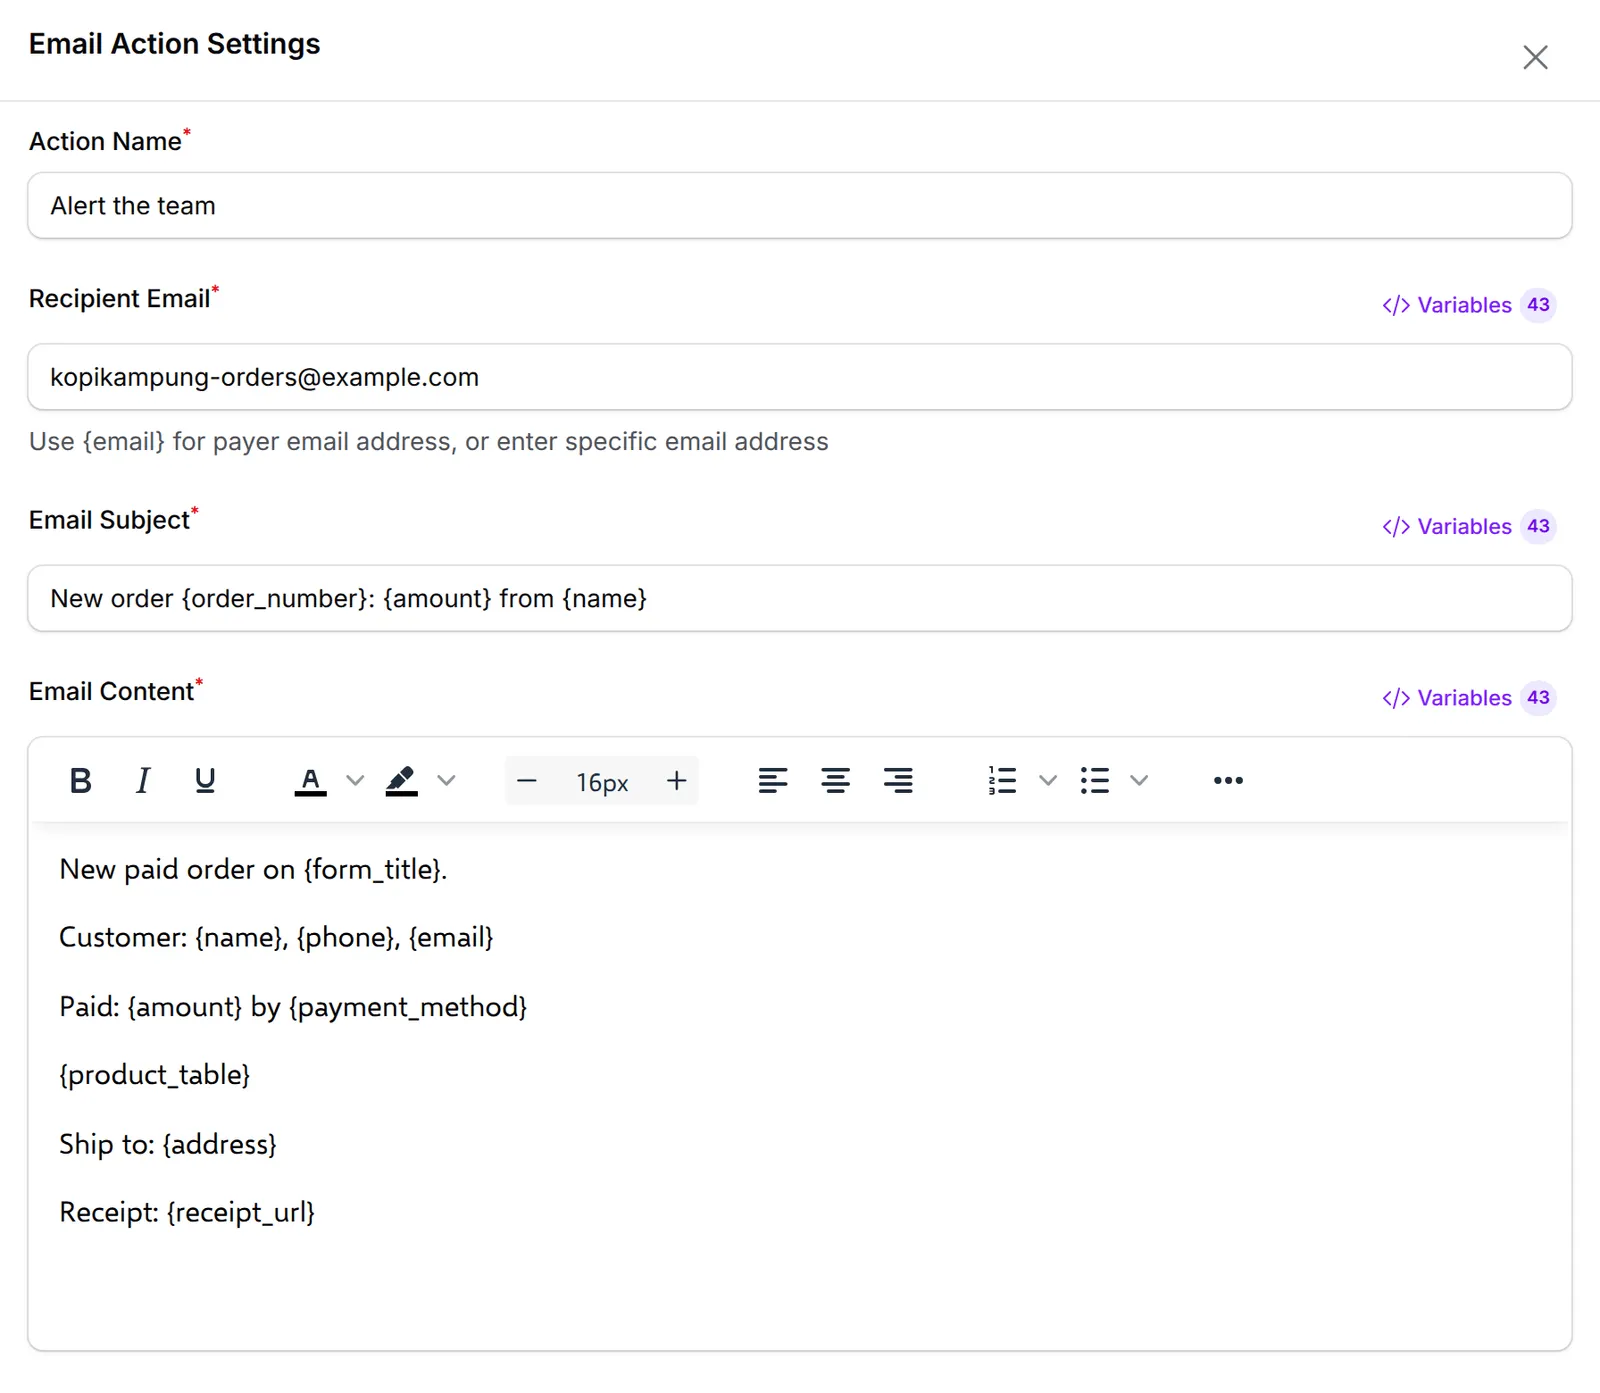
Every step has an Action Name of up to 20 characters. It becomes the label on the canvas, so name steps after what they do, for example “Alert the team”.
Send Email
Section titled “Send Email”Sends one email for each run of the automation.
| Field | What to enter |
|---|---|
| Recipient Email | One address or a variable. It starts as {email} for payments, {attendee_email} for events and {affiliate_email} for affiliates. For leads, use the email field of your form, such as {email_address:2}. |
| Email Subject | The subject line. Variables work here. |
| Email Content | The message, in a rich text editor, up to 5,000 characters. Links typed as https://... become clickable. |
| Email Address (under Test Email) | Your own address. Click the send icon to get a test with sample data. |
Click Save Email. The email comes from BCL’s sending address with your business name as the sender, and replies go to the team member who created the automation.
To email more than one person, add one Send Email step per recipient.
SMS Niaga
Section titled “SMS Niaga”Choose the Action Type:
| Action Type | Fields |
|---|---|
| Send SMS | Sender ID (empty uses your SMS Niaga setting), Phone Number ({phone} or a number such as 601XXXXXXXXX), Message (up to 160 characters) |
| Add Subscriber to Group | SMS Group (click Get Groups to load them), Subscriber Name, Subscriber Phone, Subscriber Email (Optional) |
Test SMS sends a sample to the number you enter. Click Save SMS Niaga when done.
Send Wabot and Send WasapBot
Section titled “Send Wabot and Send WasapBot”Both send a WhatsApp message from your own number through the provider you connected.
| Field | What to enter |
|---|---|
| Phone Number | {phone}, {attendee_phone}, {affiliate_phone} or a number with the country code, such as 601XXXXXXXXX. |
| Wabot Message / WasapBot Message | Plain text up to 4,096 characters, with variables. |
| Phone Number under Test Wabot / Test WasapBot | Your own number, then Send. Only shown once the provider is connected. |
Click Save Wabot or Save WasapBot. BCL waits about 5 seconds before handing the message to the provider. For a full walk-through, see Send WhatsApp after payment.
Add to Mail Niaga
Section titled “Add to Mail Niaga”| Field | What to enter |
|---|---|
| Mail Niaga Version | Mail Niaga v1 or Mail Niaga v2, whichever you connected. |
| Subscriber Name, Email Address | Usually {name} and {email}. |
| Mailing List | Click Get Lists, then pick the list. |
| Custom Field Mapping | Mail Niaga v2 only: click Add Field Mapping and pair a list field with a variable or text. |
Test Add Subscriber adds a test email and name to the chosen list. Click Save Mail Niaga when done.
Google Sheets
Section titled “Google Sheets”Choose Append Row to add a row at the bottom of the table, or Update Row to find a row by a lookup value and change some of its columns. Click Select to pick the Spreadsheet from your Google Drive, then the Sheet. BCL reads the first row as column names. See Log orders to Google Sheets for the full setup.
HTTP Request
Section titled “HTTP Request”Sends the automation’s data to any URL, for example a CRM or your own system. You set the Method, Request URL, Query Parameters, Headers and Body, and can send a test request with sample data. The HTTP Request step explains every part.
Pauses the branch before the next step.
| Delay Type | Fields | Example |
|---|---|---|
| For a Specific Period | Duration and Time Unit (Minutes, Hours, Days, Weeks) | Wait 3 days after a lead, then follow up. |
| Until a Date & Time | Date & Time | Wait until the day before your event. |
The step’s label changes to match, such as “Wait 3 Days”. A date that has already passed when the workflow reaches it stops the branch, and the history shows “Delay skipped”. If you deactivate the automation while a run is waiting, the run is cancelled when the wait ends.
Condition
Section titled “Condition”Continues only when its rules match. See Automation conditions for every field and operator.
Change, copy or remove a step
Section titled “Change, copy or remove a step”Click a step once to show its buttons: the gear opens the settings, the copy icon clones the step, and the bin removes it after you click Delete Node. The trigger can be configured but not copied or removed. Update Automation at the top saves the whole workflow.
A few habits make steps easier to manage:
- Name steps for the reader. “Send Email” three times tells you nothing in the history; “Alert the team” does.
- Test each message step before you switch the automation on. The test boxes use sample data and need no real purchase.
- Mind the 160 characters of an SMS. Variables such as
{items_summary}can make the final text longer than it looks in the editor.
Common issues
The Send Wabot step is grey and says Wabot is not connected. What is missing?
The step stays locked until the provider is connected. Under Platform Setup → Integrations → WhatsApp (Automation), turn on Wabot, paste the Access Token and Instance ID, verify the connection and save. Then reload the automation page.
Can I send a test message to myself before the automation goes live?
Yes. Email, SMS, Wabot and WasapBot steps have a test box at the bottom of their settings. Enter your own address or number and click Send. Variables are filled with sample data, so you see what the customer will get.
My old automation has a Send WasapBom step that no longer sends. What now?
WasapBOM is discontinued. Open the step, copy its message into a new Send Wabot or Send WasapBot step, then delete the old step.
Was this article helpful?
Thanks for your feedback.
Sorry this didn't help. WhatsApp us and we'll sort it out with you.